다음은 이 글의 동영상 강의 입니다.

지난시간에 S3에 업로드가 완료된 파일을 이용해서 Backend API를 이용해 DB에 데이터를 저장하는 것을 진행합니다.
S3 파일명 유니크 하게 만들기
frontend 프로젝트에 moment 라는 패키지를 설치합니다.
yarn add momentmoment는 자바스크립트에서 날짜를 핸들링할때 유용한 패키지입니다.
vue에서 moment를 import 합니다.
/admin/index.vue
import moment from 'moment';다음과 같이 현재 날짜와 시간을 문자열로 만들어주는 function을 methods: 아래에 추가합니다.
genDateTime() {
    return moment().format('YYYYMMDDHHmmss');
},
S3 파일 업로드 모듈을 다음과 같이 변경합니다.
await s3.upload({
    ACL: 'public-read',
    Body: this.genDateTime()+'_'+this.file1,
    Key: this.genDateTime()+'_'+this.file1.name
}
파일을 업로드 하면 다음과 같이 파일명이 생성됩니다.

Slider 테이블 생성
우선 MySQL Workbench를 이용해서 테이블을 생성합니다.
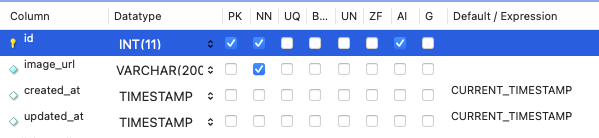
id: key값
image_url: S3의 url 정보
created_at: 생성일
updated_at: 수정일
Slider 저장용 Backend API 개발
slider-api 프로젝트에서 entity 파일을 다음과 같이 만듭니다.
/domain/slider.entity.ts
import {Column, Entity, PrimaryGeneratedColumn} from "typeorm";

@Entity('slider')
export class Slider {
    @PrimaryGeneratedColumn({type: 'int', name: 'id'})
    id: number;

    @Column('varchar', {name: 'image_url', length: 200})
    imageUrl: string;

    @Column('timestamp', {
        name: 'created_at',
        default: ()=> 'CURRENT_TIMESTAMP'
    })
    createAt: Date;

    @Column('timestamp', {
        name: 'updated_at',
        default: ()=> 'CURRENT_TIMESTAMP'
    })
    updatedAt: Date;
}
nest generator를 이용해서
slider module, controller, service를 추가합니다.
nest g module slider
nest g controller slider
nest g service slider
SliderModule에 entity를 추가합니다.
/slider/slider.module.ts
@Module({
  imports: [
    TypeOrmModule.forFeature([Slider])
  ],
  controllers: [SliderController],
  providers: [SliderService]
})
Controller에 slider api를 post로 추가합니다.
/slider/slider.controller.ts
import {BadRequestException, Body, Controller, Post, Response} from '@nestjs/common';
import {SliderService} from "./slider.service";

@Controller('slider')
export class SliderController {
    constructor(
        private sliderService: SliderService
    ) {}

    @Post('')
    async createSlider(
        @Body() createSliderDTO, @Response() res
    ): Promise<any>{
        const { imageUrl } = createSliderDTO.body;
        if(!imageUrl) throw new BadRequestException();
        await this.sliderService.createSlider({imageUrl});
        res.status(200).json({'message': 'OK'});
        return;
    }
}
Service에 createSlider method를 추가합니다.
/slider/slider.service.ts
import { Injectable } from '@nestjs/common';
import {InjectRepository} from "@nestjs/typeorm";
import {Slider} from "../domain/slider.entity";
import {Repository} from "typeorm";

@Injectable()
export class SliderService {
    constructor(
        @InjectRepository(Slider)
        private sliderRepository: Repository<Slider>
    ) {}
    async createSlider(param: { imageUrl: any }): Promise<any> {
        const {imageUrl} = param;
        await this.sliderRepository.save({imageUrl});
    }
}
Frontend 에서 slider API 호출하기
slider-front 프로젝트에서 s3 upload 후에 backend api를 호출하도록 소스를 변경합니다.
async saveImage(imageUrl){
    const headers = {
        'Content-Type': 'application/json',
        'Authorization': `Bearer ${this.accessToken}`
    }
    const body = {
        'imageUrl': imageUrl
    }
    await this.$axios.post(
        '/slider',
        {body},
        {headers}
    ).catch(error =>{
        console.log(error);
    })

},
async upload() {
    if(!this.file1){
        alert('File을 선택해주세요!')
    }else{
        console.log(this.file1);
        AWS.config.region = this.bucketRegion;
        AWS.config.credentials = new AWS.CognitoIdentityCredentials({
            IdentityPoolId: this.identityPoolId,
        });
        const s3 = new AWS.S3({
            apiVersion: '2006-03-01',
            params: {
                Bucket: this.bucketName+'/images'
            }
        });
        await s3.upload({
            ACL: 'public-read',
            Body: this.genDateTime()+'_'+this.file1,
            Key: this.genDateTime()+'_'+this.file1.name
        }, (error)=>{
            if(error){
                this.errorHandler(error);
            }
        }).promise().then((data)=>{
            console.log('File uploaded!!!')
            console.log(data);
            this.saveImage(data.Location);
        })
    }
}
파일 업로드 테스트를 합니다.
DB에 다음과 같이 데이터가 들어간것을 볼 수 있습니다.

이렇게 해서 S3 업로드 파일을 Backend API를 통해 DB에 저장하는 기능을 구현해 보았습니다.
'Nestjs 활용 동영상강좌' 카테고리의 다른 글
| [Nestjs] TypeORM Multiple Database Connection 설정 및 사용법 (0) | 2024.09.15 |
|---|---|
| Nestjs 프로젝트를 Docker로 배포하기 (2) | 2022.12.30 |
| (풀스택) Node(Nest)와 Vue(Nuxt)로 사이트 만들기 - 12.이미지 슬라이드 개발 (0) | 2022.12.20 |
| (풀스택) Node(Nest)와 Vue(Nuxt)로 사이트 만들기 - 11.이미지 조회 및 삭제 (0) | 2022.12.18 |
| (풀스택) Node(Nest)와 Vue(Nuxt)로 사이트 만들기 - 09.Front에서 S3에 파일 업로드하기 (0) | 2022.10.23 |
| (풀스택) Node(Nest)와 Vue(Nuxt)로 사이트 만들기 - 08.AWS S3 설정 (0) | 2022.10.22 |
| (풀스택) Node(Nest)와 Vue(Nuxt)로 사이트 만들기 - 07.사용자 권한 관리 (0) | 2022.10.15 |
| (풀스택) Node(Nest)와 Vue(Nuxt)로 사이트 만들기 - 06.Front 로그인 (with Jwt Token) (0) | 2022.10.03 |