
Flutter 개발 환경 설정에 대해 알아봅니다.
이 글은 Flutter 공식 홈페이지의 Get Started 문서를 참조하였습니다.
https://docs.flutter.dev/get-started/install
Choose your development platform to get started
Install Flutter and get started. Downloads available for Windows, macOS, Linux, and ChromeOS operating systems.
docs.flutter.dev
플랫폼 선택
환경에 맞게 선택하시면 됩니다.
저는 맥을 선택하였습니다.

Type of app
다음으로는 어떤 종류의 앱을 만들 것인지를 선택해야 합니다.
저는 iOS를 선택하였습니다.

Software 설치
- Apple Sillicon을 사용하는 Mac일 경우 Rosetta 2 translation process를 설치해야 합니다.
- Mac에서 intel 기반의 app을 실행할 때 필요한 유틸리티입니다.
sudo softwareupdate --install-rosetta --agree-to-license- XCode 설치
- Swift 와 ObjectC code를 컴파일하고 디버깅 하기 위해 XCode를 설치합니다.
- https://developer.apple.com/xcode/
Xcode - Apple Developer
Xcode includes everything you need to develop, test, and distribute apps across all Apple platforms.
developer.apple.com
- CocoaPods 설치
- Native앱에 Flutter plugin 컴파일이 가능하도록 CocoaPods을 설치합니다.
- https://cocoapods.org/
CocoaPods.org
CocoaPods is built with Ruby and is installable with the default Ruby available on macOS. We recommend you use the default ruby. Using the default Ruby install can require you to use sudo when installing gems. Further installation instructions are in the g
cocoapods.org
- 아래 명령어를 사용하여 cocoapods를 설치합니다
sudo gem install cocoapods- cocoapods 설치시 다음과 같은 오류가 발생할 수 있습니다.
ERROR:  Error installing cocoapods:
ERROR: Failed to build gem native extension.- 이때는 xcode-select를 인스톨 하면 됩니다.
- xcode-select는 XCode의 명령줄 관리 도구입니다.
xcode-select --install- 간혹 xcode-select도 아래와 같이 설치가 안될 경우가 있습니다.
xcode-select: note: Command line tools are already installed.
Use "Software Update" in System Settings or the softwareupdate
command line interface to install updates- 이때는 software update를 download 하여 설치하면 해결 할 수 있습니다.
- software update는 운영 체제와 관련된 모든 소프트웨어 업데이트를 자동으로 설치하는 기능을 수행합니다.
- 따라서 다운로드 및 설치 시간이 좀 많이 소요됩니다.
softwareupdate --install -a- 다운로드가 완료되면 "시스템 설정"에 업데이트가 표시되고, 업데이트를 클릭 하시면됩니다.
-
업데이트가 완료되면 다시 CocoaPods를 설치합니다.
-
sudo gem install cocoapods- 설치가 완료되면 다음과 같이 메시지가 표시됩니다.

Text Editor Settings
- Text editor는 Visual Studio Code, Android Studio, IntelliJ IDEA등을 사용할 수 있습니다.
- 저는 Visual Studio Code를 선택하였습니다.
- Visual Studio Code를 설치하고, 실행합니다.
- 아래 링크에 있는 Dart Extention을 추가합니다.
- https://marketplace.visualstudio.com/items?itemName=Dart-Code.flutter
- Command Palette를 실행합니다. 단축키는 Command+Shift+P 입니다.
- Command Palette에서 "flutter"를 입력합니다.

- "Flutter:New Project"를 선택합니다.
- 이때 Flutter SDK가 설치 되어 있지 않으면 다운로드하여 설치하시면됩니다.
- 설치가 되어 있다면 위치를 지정해주면 됩니다.
- SDK 설치 후에 Command Palette에서 "Flutter:New Project"를 선택하고 "flutter-first" 라는 프로젝트를 생성합니다.

iOS 개발환경 설정
- XCode를 설치합니다.
- XCode의 버전에 맞는 command line tool을 설치합니다.
sudo sh -c 'xcode-select -s /Applications/Xcode.app/Contents/Developer && xcodebuild -runFirstLaunch'- XCode license에 동의 서명을 합니다.
sudo xcodebuild -license
iOS Simulator 설치
- iOS Simulator를 설치합니다.
xcodebuild -downloadPlatform iOS- Simulator를 실행합니다
open -a Simulator- XCode를 실행합니다.
- 메뉴에서 Windows - Devices and Simulators를 선택합니다.
- simulator 탭을 클릭하면 사용 가능한 리스트가 나옵니다.

- XCode에서 flutter_first 프로젝트를 엽니다.
- 탐색 창에서 flutter_first 프로젝트 아래 있는 ios를 선택하면 됩니다.

- XCode 상단의 파란색 실행 버튼을 클릭합니다.
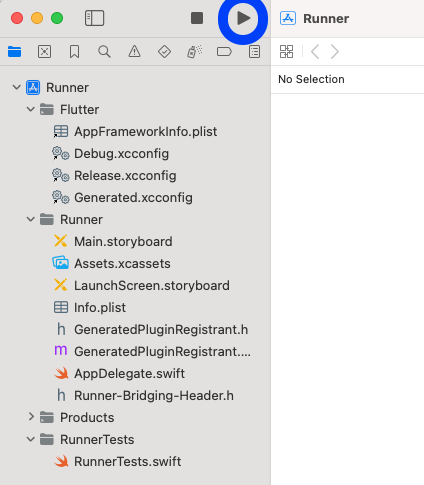
- 아래와 같이 simulator가 실행됩니다.

'Flutter' 카테고리의 다른 글
| Dart로 Hello World 출력하기 (0) | 2024.10.01 |
|---|---|
| Dart Language 소개 (1) | 2024.09.23 |