반응형
이 포스트의 동영상 강의

이번 글은 일렉트론 공식 홈페이지에 있는 퀵스타트를 요약한 것입니다.
https://www.electronjs.org/docs/latest/tutorial/quick-start
Quick Start | Electron
This guide will step you through the process of creating a barebones Hello World app in Electron, similar to electron/electron-quick-start.
www.electronjs.org

Nodejs 설치 및 업데이트
- Electron을 개발하기 위해서는 우선 nodejs가 설치 되어 있어야 합니다.
- nodejs 홈페이지에서 nodejs를 설치합니다.
- https://nodejs.org/ko/
- 설치 후 다음 명령을 사용하여 설치 버전을 확인합니다.
node -v
npm -v프로젝트 폴더 생성
- mkdir my-electron-app
- cd my-electron-app
프로젝트 생성
- npm init
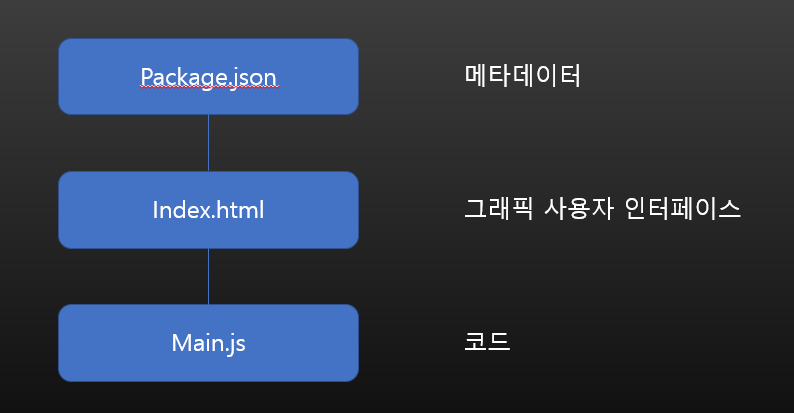
Package.json 파일 확인
{
  "name": "my-electron-app",
  "version": "1.0.0",
  "description": “First electron app",
  "main": "index.js",
  "scripts": {
    "test": "echo \"Error: no test specified\" && exit 1"
  },
  "author": "",
  "license": "ISC"
}- "main": "index.js" : entry point로 프로그램의 시작점입니다.
- 파일명은 index.js 또는 main.js를 일반적으로 사용합니다.
Electron Package 추가
- 프로젝트에서 electron을 사용하기 위해서는 "electron" 패키지를 반드시 추가해야 합니다.
npm install --save-dev electronPackage.json에 script 추가
- 실행 스크립트를 다음과 같이 추가합니다.
- npm start로 스크립트를 실행할 수 있습니다.
    "scripts": {
        "start": "electron ."
    }
index.html 생성
- root 폴더에 index.html을 만들고 다음과 같이 작성합니다.
<!DOCTYPE html>
<html>
  <head>
    <meta charset="UTF-8">
    <!-- https://developer.mozilla.org/en-US/docs/Web/HTTP/CSP -->
    <meta http-equiv="Content-Security-Policy" content="default-src 'self'; script-src 'self'">
    <meta http-equiv="X-Content-Security-Policy" content="default-src 'self'; script-src 'self'">
    <title>Hello World!</title>
  </head>
  <body>
    <h1>Hello World!</h1>
    We are using Node.js <span id="node-version"></span>,
    Chromium <span id="chrome-version"></span>,
    and Electron <span id="electron-version"></span>.
  </body>
</html>
index.js 생성
- root 폴더에 index.js를 만들고 다음과 같이 작성합니다.
const { app, BrowserWindow } = require('electron')
// include the Node.js 'path' module at the top of your file
const path = require('path')


// modify your existing createWindow() function
function createWindow () {
  const win = new BrowserWindow({
    width: 800,
    height: 600,
    webPreferences: {
      preload: path.join(__dirname, 'preload.js')
    }
  })
  win.loadFile('index.html')
}
app.whenReady().then(() => {
  createWindow()
})
app.on('window-all-closed', function () {
  if (process.platform !== 'darwin') app.quit()
})
preload.js 생성
- root 폴더에 preload.js를 생성 합니다.
window.addEventListener('DOMContentLoaded', () => {
  const replaceText = (selector, text) => {
    const element = document.getElementById(selector)
    if (element) element.innerText = text
  }

  for (const dependency of ['chrome', 'node', 'electron']) {
    replaceText(`${dependency}-version`, process.versions[dependency])
  }
})
프로젝트 실행
npm start실행 화면

패키징과 배포
- 패키징과 배포를 위한 가장 빠른 방법은 Electron Forge를 사용하는 것입니다.
- Electron Forge 패키지를 추가합니다.
npm install --save-dev @electron-forge/cli
npx electron-forge import- Forge의 "make"를 이용하여 빌드합니다.
npm run make- 실행 파일의 위치는 다음과 같습니다.
\out\my-electron-app-win32-x64\my-electron-app.exe이상으로 Electron Quick Start를 마칩니다.

반응형
'일렉트론' 카테고리의 다른 글
| 일렉트론기초-09.일렉트론 커스텀 타이틀바 만들기-프로그램개발(IPC) (0) | 2021.10.04 |
|---|---|
| 일렉트론기초-08.일렉트론 커스텀 타이틀바 만들기-화면디자인 (0) | 2021.10.04 |
| 일렉트론기초-07.일렉트론 화면 개발하기 (0) | 2021.10.03 |
| 일렉트론기초-06.일렉트론 메뉴 추가하기 (0) | 2021.10.01 |
| 일렉트론기초-05.React 프로젝트에 일렉트론을 추가하는 법 (0) | 2021.09.29 |
| 일렉트론기초-04.일렉트론 프로젝트 쉽게 만들고 쉽게 실행하기 (0) | 2021.09.28 |
| 일렉트론기초-03.일렉트론 프로젝트에 React 추가하기 (0) | 2021.09.22 |
| 일렉트론기초-01.일렉트론이란? (0) | 2021.09.19 |